你可曾想过放弃百度统计、放弃谷歌统计,使用自己的统计代码?
Matomo可以完成这个愿望
本教程使用宝塔面板演示,使用环境版本比官方要求的高,以下是官方要求的环境
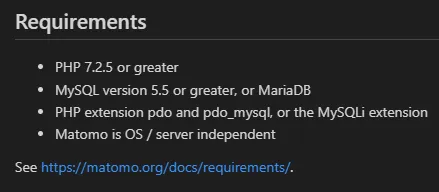
翻译:
- PHP 7.2.5 或更高
- MySQL 版本 5.5 或更高,或 MariaDB
- 需要PHP扩展:pdo和pdo_mysql,或者MySQLi扩展
- Matomo的运行与系统、服务器无关(也可译为独立于系统、服务器)
我使用的环境:
- PHP 8.1
- MySQL 8
- MySQLi扩展与pdo、pdo_mysql扩展同时拥有
- 雨云 KVM 机型:4C8G Ubuntu Server 22.04+BBR
首先需要下载源码Download Matomo Free Web Analytics Tool – #1 Open Source Analytics
如果这里下载太慢的话,我提供了一个镜像(可能不是最新)
https://res.biliwind.com/s/k5h6
之后我们在宝塔面板里添加一个站点,域名请填你自己的,如果没用,直接填写服务器ip(也可以使用ip:port的格式)

记好数据库账号,密码
之后关掉创建成功的窗口,在网站后面的“设置”里点击SSL


之后点击“Let‘s Encrypt”勾选域名,点击申请,之后就可以获得免费的SSL
如果你希望启用HSTS,请勿打开“强制HTTPS”,而是修改配置文件
之后我们点击“根目录”进入网站的根目录

上传源码

点击上传的压缩包后面的“解压”

在弹出的窗口中点击解压

之后删除这些多余文件

点击“matomo”文件夹,进入目录

全选并点击右上角的剪切

点击左上角的“退格”箭头回到上级目录

在右上角点击粘贴:

之后我们访问站点地址就可以开始安装了:

在起始页面点击下一步后会自动检查系统环境

这里大概浏览一下,本教学是使用Rainginx(Nginx改版)作为web服务器的,所以会出现

我们在宝塔面板的网站设置中找到“伪静态”,将下面的代码粘贴进去(基于官方提供的改的)
## only allow accessing the following php files
    location ~ ^/(index|matomo|piwik|js/index|plugins/HeatmapSessionRecording/configs)\.php$ {
        #include snippets/fastcgi-php.conf; # if your Nginx setup doesn't come with a default fastcgi-php config, you can fetch it from https://github.com/nginx/nginx/blob/master/conf/fastcgi.conf
    add_header Referrer-Policy origin always; # make sure outgoing links don't show the URL to the Matomo instance
    add_header X-Content-Type-Options "nosniff" always;
    add_header X-XSS-Protection "1; mode=block" always;
        fastcgi_param  SCRIPT_FILENAME    $document_root$fastcgi_script_name;
fastcgi_param  QUERY_STRING       $query_string;
fastcgi_param  REQUEST_METHOD     $request_method;
fastcgi_param  CONTENT_TYPE       $content_type;
fastcgi_param  CONTENT_LENGTH     $content_length;

fastcgi_param  SCRIPT_NAME        $fastcgi_script_name;
fastcgi_param  REQUEST_URI        $request_uri;
fastcgi_param  DOCUMENT_URI       $document_uri;
fastcgi_param  DOCUMENT_ROOT      $document_root;
fastcgi_param  SERVER_PROTOCOL    $server_protocol;
fastcgi_param  REQUEST_SCHEME     $scheme;
fastcgi_param  HTTPS              $https if_not_empty;

fastcgi_param  GATEWAY_INTERFACE  CGI/1.1;
fastcgi_param  SERVER_SOFTWARE    nginx/$nginx_version;

fastcgi_param  REMOTE_ADDR        $remote_addr;
fastcgi_param  REMOTE_PORT        $remote_port;
fastcgi_param  SERVER_ADDR        $server_addr;
fastcgi_param  SERVER_PORT        $server_port;
fastcgi_param  SERVER_NAME        $server_name;

# PHP only, required if PHP was built with --enable-force-cgi-redirect
fastcgi_param  REDIRECT_STATUS    200;
        try_files $fastcgi_script_name =404; # protects against CVE-2019-11043. If this line is already included in your snippets/fastcgi-php.conf you can comment it here.
        fastcgi_param HTTP_PROXY ""; # prohibit httpoxy: https://httpoxy.org/
        fastcgi_pass unix:/tmp/php-cgi-81.sock; #replace with the path to your PHP socket file
        #fastcgi_pass 127.0.0.1:9000; # uncomment if you are using PHP via TCP sockets (e.g. Docker container)
    }

    ## deny access to all other .php files
    location ~* ^.+\.php$ {
        deny all;
        return 403;
    }

    ## serve all other files normally
    location / {
        try_files $uri $uri/ =404;
    }

    ## disable all access to the following directories
    location ~ ^/(config|tmp|core|lang) {
        deny all;
        return 403; # replace with 404 to not show these directories exist
    }

    location ~ /\.ht {
        deny  all;
        return 403;
    }

    location ~ js/container_.*_preview\.js$ {
        expires off;
        add_header Cache-Control 'private, no-cache, no-store';
    }

    location ~ \.(gif|ico|jpg|png|svg|js|css|htm|html|mp3|mp4|wav|ogg|avi|ttf|eot|woff|woff2)$ {
        allow all;
        ## Cache images,CSS,JS and webfonts for an hour
        ## Increasing the duration may improve the load-time, but may cause old files to show after an Matomo upgrade
        expires 1h;
        add_header Pragma public;
        add_header Cache-Control "public";
    }

    location ~ ^/(libs|vendor|plugins|misc|node_modules) {
        deny all;
        return 403;
    }

    ## properly display textfiles in root directory
    location ~/(.*\.md|LEGALNOTICE|LICENSE) {
        default_type text/plain;
    }
保存之后点击下一步配置数据库即可

数据库账号和数据库名称是同一个,之前创建网站时有设置过的
适配器强烈建议选择MySQLi
看到此提示即为成功

点击下一步,之后配置管理员的用户名与密码即可
再次点击下一步,会要求配置站点信息,这里的站点就是你添加的第一个分析站点

这里根据自身实际填写即可,点击下一步,之后你就获得专属于自己的统计代码了

之后无脑下一步即可,随后会跳转到后台登录的页面
使用管理员账号登录即可
之后我们可以在右上角点击齿轮图标进入设置页

我们点击平台-商城,可以在这里寻找自己喜欢的插件


在激活某些插件时,可能会弹出以下提示:

我们滑倒下面直接点击升级即可







暂无评论内容